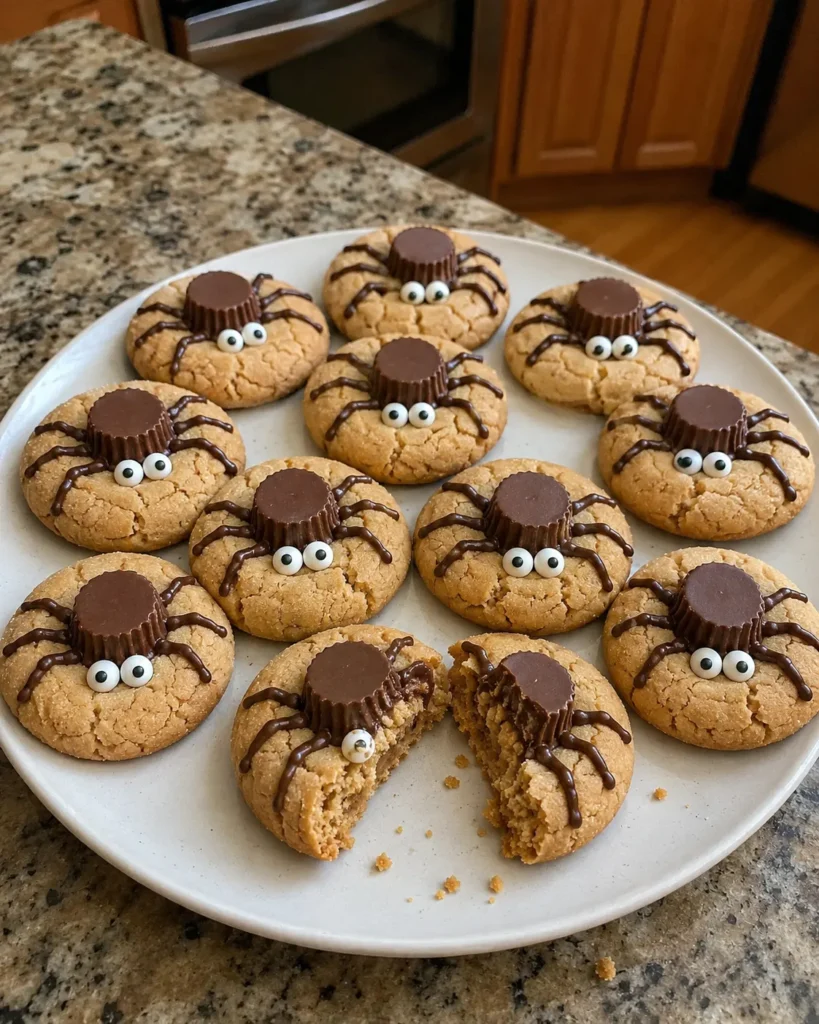
Peanut Butter Spider Cookies turn a soft, familiar peanut butter cookie into a playful Halloween dessert with a chocolate candy body, piped legs, and bright candy eyes. Each cookie has lightly crisp edges, a tender center, deep roasted-peanut flavor, and just enough chocolate to make the decoration taste like part of the dessert rather than an afterthought.
They look detailed, but the decorating process is wonderfully manageable for beginner bakers. Make them for a Halloween party, classroom celebration, fall bake sale, or family movie night, and save or print the recipe before the busy season arrives.
Quick Peanut Butter Spider Cookies Snapshot
| Detail | Information |
|---|---|
| Prep time | 25 minutes |
| Cook time | 8–10 minutes per batch |
| Total time | About 55 minutes |
| Servings | 24 cookies |
| Serving size | 1 decorated cookie |
| Difficulty | Easy |
| Cooking method | Oven-baked |
| Flavor | Sweet, nutty, buttery, and chocolatey |
| Texture | Soft center with lightly crisp edges |
| Best for | Halloween parties, bake sales, and fall gatherings |
Table of Contents
Table of Contents
Why You’ll Love These Peanut Butter Spider Cookies
- The cookie dough uses familiar baking ingredients and a simple creaming method.
- Soft peanut butter centers contrast with the smooth chocolate decorations.
- No advanced piping technique is required; slightly uneven legs make the spiders more charming.
- The cookies can be baked ahead and decorated after cooling.
- Children can help add candy eyes with appropriate adult supervision.
- They make a recognizable Halloween dessert without requiring shaped cutters.
Ingredients and Why They Matter
Conventional creamy peanut butter gives the dough a consistent texture and helps the cookies hold their rounded shape. Natural peanut butter that separates heavily may introduce too much oil or too little structure, so stir it extremely well or use a standard no-stir variety.
Softened butter brings tenderness and allows air to be incorporated with the sugars. Brown sugar contributes moisture and a mild caramel note, while granulated sugar helps the edges set and creates a delicate sparkle when used for rolling.
| Main Ingredient | Purpose | Nutrition Contribution | Best Substitution |
|---|---|---|---|
| Creamy peanut butter | Supplies flavor, richness, and structure | Protein, fat, and some fiber | No-stir almond butter, with a flavor change |
| All-purpose flour | Builds the cookie’s structure | Carbohydrates and some protein | Measure-for-measure gluten-free baking flour |
| Unsalted butter | Adds tenderness and buttery flavor | Total and saturated fat | Baking margarine |
| Brown sugar | Adds moisture and caramel flavor | Carbohydrates and added sugar | Dark brown sugar |
| Egg | Binds and supports the dough | Protein and fat | Tested commercial egg replacer |
| Chocolate cups | Form the spider bodies | Fat, sugar, and some protein | Chocolate truffles or large chocolate buttons |
| Melting chocolate | Creates legs and holds the eyes | Fat and added sugar | Chocolate-flavored candy melts |
Measure the flour by spooning it into the measuring cup and leveling the top. Scooping directly from the bag can compress the flour and create dry cookies that crack excessively.
How to Make Peanut Butter Spider Cookies
1. Prepare the oven and pans
Preheat the oven to 350°F. Line two large baking sheets with parchment paper. Unwrap the miniature peanut butter cups before baking so they are ready when the hot cookies leave the oven.
Whisk together 1¾ cups all-purpose flour, 1 teaspoon baking soda, and ¼ teaspoon salt. Mixing the dry ingredients separately distributes the baking soda evenly and reduces the chance of bitter pockets.
2. Cream the butter, peanut butter, and sugars
Beat ½ cup softened unsalted butter with ½ cup creamy peanut butter for about one minute. Add ½ cup granulated sugar and ½ cup packed light-brown sugar, then beat for two minutes until the mixture looks slightly lighter and fluffy.
Add one large egg and 1 teaspoon vanilla extract. Mix until smooth, scraping the bowl so no streaks of butter remain.
3. Finish and portion the dough
Add the flour mixture gradually and mix only until no dry flour is visible. Overmixing develops more gluten, which can make Peanut Butter Spider Cookies firmer and less tender.
Shape the dough into 24 balls using about one level tablespoon for each. Roll them in an additional ¼ cup granulated sugar and arrange them about two inches apart. If the dough feels unusually soft or oily, refrigerate it for 20 minutes before baking.
4. Bake until softly set
Bake for 8–10 minutes. Look for lightly golden edges, dry-looking tops, small cracks, and centers that appear soft but no longer wet.
Do not wait for the centers to become firm in the oven. Residual heat continues setting the cookies on the pan, and overbaking removes the soft texture that makes them appealing.
FoodSafety.gov advises against tasting raw dough made with uncooked egg or flour, so wait until the cookies are fully baked before sampling. Read the official raw-dough safety guidance.
5. Add the chocolate bodies
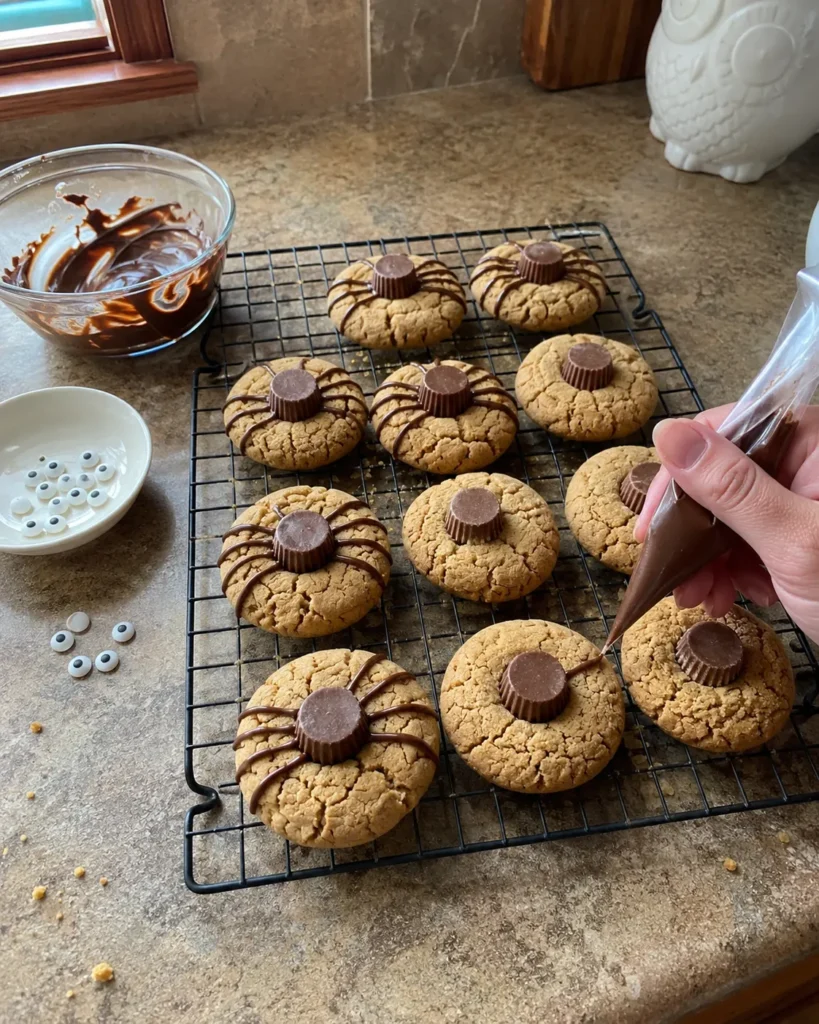
Immediately press one miniature peanut butter cup, wide side down, into the center of every warm cookie. Press gently—just enough to secure the candy without splitting the cookie.
Leave the cookies on the pan for five minutes, then transfer them carefully to a cooling rack. The candy may become glossy from the heat, so avoid touching it until completely set.
6. Pipe the legs and attach the eyes
Melt ¾ cup semisweet melting wafers or chocolate chips in short microwave intervals, stirring every 15–20 seconds. Transfer the smooth chocolate to a small piping bag or zip-top bag and cut a very small opening.
Pipe four legs on each side of every candy body. Add a small dot of chocolate behind each candy eye, then attach two eyes. Let the finished Peanut Butter Spider Cookies rest until the chocolate becomes firm.
Tips, Mistakes, and Substitutions – Peanut Butter Spider Cookies
Keep the cookie size consistent so every batch finishes at approximately the same time. A small cookie scoop is helpful, but weighing or carefully dividing the dough also works.
Do not place the peanut butter cups on the unbaked dough. The candy can lose its shape in the oven. Pressing it into the freshly baked cookies supplies enough heat to soften its base and anchor it securely.
If the cookies spread too much, the butter was likely overly warm, the flour was undermeasured, or the baking sheet was hot before the dough was added. Chill the remaining dough and use a completely cool pan.
Candy melts produce the easiest, firmest legs. Semisweet chocolate tastes richer but may remain softer in a warm room. For another peanut butter-and-chocolate dessert, try these Protein Twix Bars, which use a nutty base, peanut butter layer, and chocolate topping.
A measure-for-measure gluten-free flour can replace regular flour, although the cookies may be slightly more delicate. A seed-butter substitution changes both flavor and allergen profile; it does not make the cookies safe automatically because the candy and other packaged ingredients may carry cross-contact warnings.
Serving Ideas and Variations
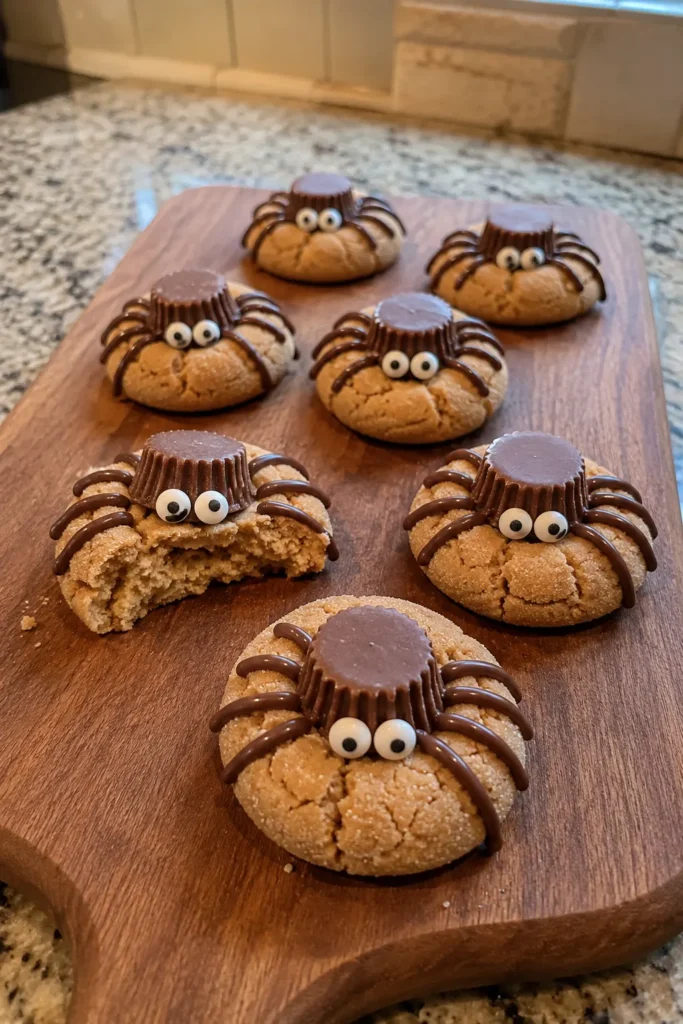
Arrange the cookies on a dark platter with parchment underneath so the spider shapes remain easy to see. They pair naturally with apple cider, milk, coffee, or hot chocolate and look especially inviting beside orange, purple, or black paper napkins.
For a larger Halloween dessert spread, add Pumpkin Spice Baked Donuts for warm fall spice and Apple Pie Cupcakes for a fruit-filled option.
Create different expressions by changing the position of the candy eyes. Use white chocolate for pale spider legs, dark chocolate for stronger contrast, or a combination for a mixed tray. A tiny amount of orange or purple sanding sugar can add seasonal color, but avoid covering the spider design.
For smaller cookies, divide the dough into 30 portions and use smaller chocolate candies. Begin checking them after seven minutes because reduced portions bake more quickly.
Storage, Freezing, and Reheating – Peanut Butter Spider Cookies
Store fully cooled Peanut Butter Spider Cookies in a single layer or between sheets of parchment in an airtight container. They remain at their best for about four to five days at cool room temperature. USDA guidance allows longer room-temperature storage for many homemade cookies, but the shorter period recommended here protects the appearance and texture of the chocolate decorations. Review the USDA cookie-storage guidance.
To freeze decorated cookies, let the chocolate set completely, freeze them uncovered on a tray until firm, and transfer them to a freezer-safe container with parchment between layers. Freeze for up to two months. Thaw them inside the closed container at room temperature to reduce condensation on the chocolate.
You can also freeze undecorated baked cookies. Thaw, then attach the candy bodies with melted chocolate instead of pressing them into warm cookies. Reheating is unnecessary and may melt the decorations.
Nutrition and Dietary Notes
Nutrition values are estimates based on the listed ingredients, yield, and assumed serving size. Values vary according to brands, substitutions, and portion size.
| Nutrient | Estimated Amount per Serving | Main Source |
|---|---|---|
| Calories | 220 | Peanut butter, butter, sugars, and candy |
| Protein | 4 g | Peanut butter, egg, and flour |
| Carbohydrates | 28 g | Flour, sugars, and chocolate |
| Fiber | 1 g | Peanut butter and flour |
| Total sugars | 18 g | Brown sugar, granulated sugar, and candy |
| Added sugars | About 17 g | Sugars and chocolate decorations |
| Total fat | 11 g | Peanut butter, butter, and chocolate |
| Saturated fat | 5 g | Butter and chocolate |
| Sodium | 150 mg | Peanut butter, baking soda, and candy |
| Iron | About 1 mg | Flour, peanut butter, and chocolate |
One cookie functions primarily as a dessert or sweet snack rather than a complete meal. Peanut butter provides most of the protein and unsaturated fat, while butter and chocolate supply much of the saturated fat. Flour and sugars provide most of the carbohydrates, and the candy decorations account for a meaningful portion of the added sugar.
For a smaller serving, make 30 cookies and use smaller candies; the texture will be similar, but the baking time will decrease. To reduce sodium modestly, select lower-sodium peanut butter while recognizing that the flavor may taste less pronounced. To increase fiber slightly, replace a small portion of the all-purpose flour with whole-wheat pastry flour, which can make the cookies a little heartier.
These cookies contain peanuts, wheat, milk, and egg, and many chocolate products contain soy. The FDA identifies peanuts, wheat, milk, eggs, and soy among the major food allergens, so check every candy and decorating product rather than relying on appearance or brand familiarity. See the FDA’s food-allergen label guidance.
Frequently Asked Questions – Peanut Butter Spider Cookies
Why did my Peanut Butter Spider Cookies spread?
The butter may have been too warm, the flour may have been undermeasured, or the dough may have been placed on a hot pan. Chill soft dough for 20–30 minutes and always begin with a cool baking sheet.
Can I use natural peanut butter?
You can, but it must be thoroughly stirred and relatively thick. Very runny natural peanut butter can cause extra spreading and a more crumbly texture.
When should I add the peanut butter cups?
Press them into the cookies immediately after baking. The residual heat softens the bottom of each cup enough to help it adhere without completely melting the candy.
Can I prepare the dough ahead?
Yes. Refrigerate the covered dough for up to two days. Let it soften briefly if it becomes too firm to scoop, then roll, coat in sugar, and bake.
How do I keep the chocolate legs neat?
Use smoothly melted chocolate and cut the smallest possible opening in the piping bag. Practice two or three lines on parchment before decorating the cookies.
Can children help decorate them?
Children can add eyes or help pipe simple legs with supervision. Adults should handle the hot baking sheets, warm cookies, melted chocolate, and any small candies that may pose a choking risk.
Final Thoughts – Peanut Butter Spider Cookies
Peanut Butter Spider Cookies combine a dependable soft cookie with a decoration that feels festive rather than fussy. Their nutty centers, chocolate details, and playful faces make them an easy centerpiece for Halloween dessert trays.
Print
Peanut Butter Spider Cookies
- Prep Time: 25 minutes
- Cook Time: 10 minutes
- Total Time: 55 minutes
- Yield: 24 cookies 1x
- Category: Dessert
- Method: Baking
- Cuisine: American
- Diet: Vegetarian
Description
Soft peanut butter cookies decorated with miniature chocolate peanut butter cups, piped chocolate legs, and candy eyes for an easy and playful Halloween dessert.
Ingredients
1 3/4 cups all-purpose flour
1 teaspoon baking soda
1/4 teaspoon salt
1/2 cup unsalted butter, softened
1/2 cup conventional creamy peanut butter
1/2 cup granulated sugar
1/2 cup packed light brown sugar
1 large egg
1 teaspoon vanilla extract
1/4 cup granulated sugar, for rolling
24 miniature chocolate peanut butter cups, unwrapped
3/4 cup semisweet melting wafers or chocolate chips
48 candy eyes
Instructions
1. Preheat the oven to 350°F. Line two large baking sheets with parchment paper and unwrap the miniature peanut butter cups.
2. Whisk the all-purpose flour, baking soda, and salt together in a medium bowl.
3. Beat the softened butter and creamy peanut butter together for about 1 minute. Add the granulated sugar and light brown sugar, then beat for about 2 minutes until slightly lighter and fluffy.
4. Add the egg and vanilla extract. Mix until smooth, scraping down the sides of the bowl as needed.
5. Gradually add the dry ingredients and mix only until no dry flour remains.
6. Divide the dough into 24 tablespoon-size balls. Roll each ball in the additional granulated sugar and arrange them about 2 inches apart on the prepared baking sheets.
7. Bake for 8 to 10 minutes, until the edges are lightly golden and the centers look softly set. The tops should appear dry with a few small cracks.
8. Immediately press one miniature peanut butter cup, wide side down, into the center of each warm cookie.
9. Leave the cookies on the baking sheets for 5 minutes, then transfer them carefully to a wire cooling rack. Cool completely.
10. Melt the semisweet melting wafers or chocolate chips in short microwave intervals, stirring every 15 to 20 seconds until smooth.
11. Transfer the melted chocolate to a small piping bag or zip-top bag and cut a very small opening.
12. Pipe four chocolate legs on each side of every peanut butter cup body. Use small dots of melted chocolate to attach two candy eyes.
13. Let the decorated cookies rest until the chocolate is completely firm before serving or storing.
Notes
Use conventional no-stir creamy peanut butter for the most predictable cookie shape and texture.
Measure the flour by spooning it into the measuring cup and leveling the top. Too much flour can produce dry, crumbly cookies.
If the dough feels unusually soft or oily, refrigerate it for 20 minutes before shaping.
Do not overbake. The centers should remain soft when the cookies leave the oven and will firm as they cool.
Unwrap the miniature peanut butter cups before baking so they can be pressed into the cookies immediately.
Store fully cooled cookies in an airtight container at room temperature for 4 to 5 days.
Freeze decorated or undecorated cookies for up to 2 months.
This recipe contains peanuts, wheat, milk, egg, and possibly soy.
Nutrition
- Serving Size: 1 decorated cookie
- Calories: 220 kcal
- Sugar: 18g
- Sodium: 150mg
- Fat: 11g
- Saturated Fat: 5g
- Unsaturated Fat: 6g
- Trans Fat: 0g
- Carbohydrates: 28g
- Fiber: 1g
- Protein: 4g
- Cholesterol: 20mg